Leveling up Proxmox with Clustering!

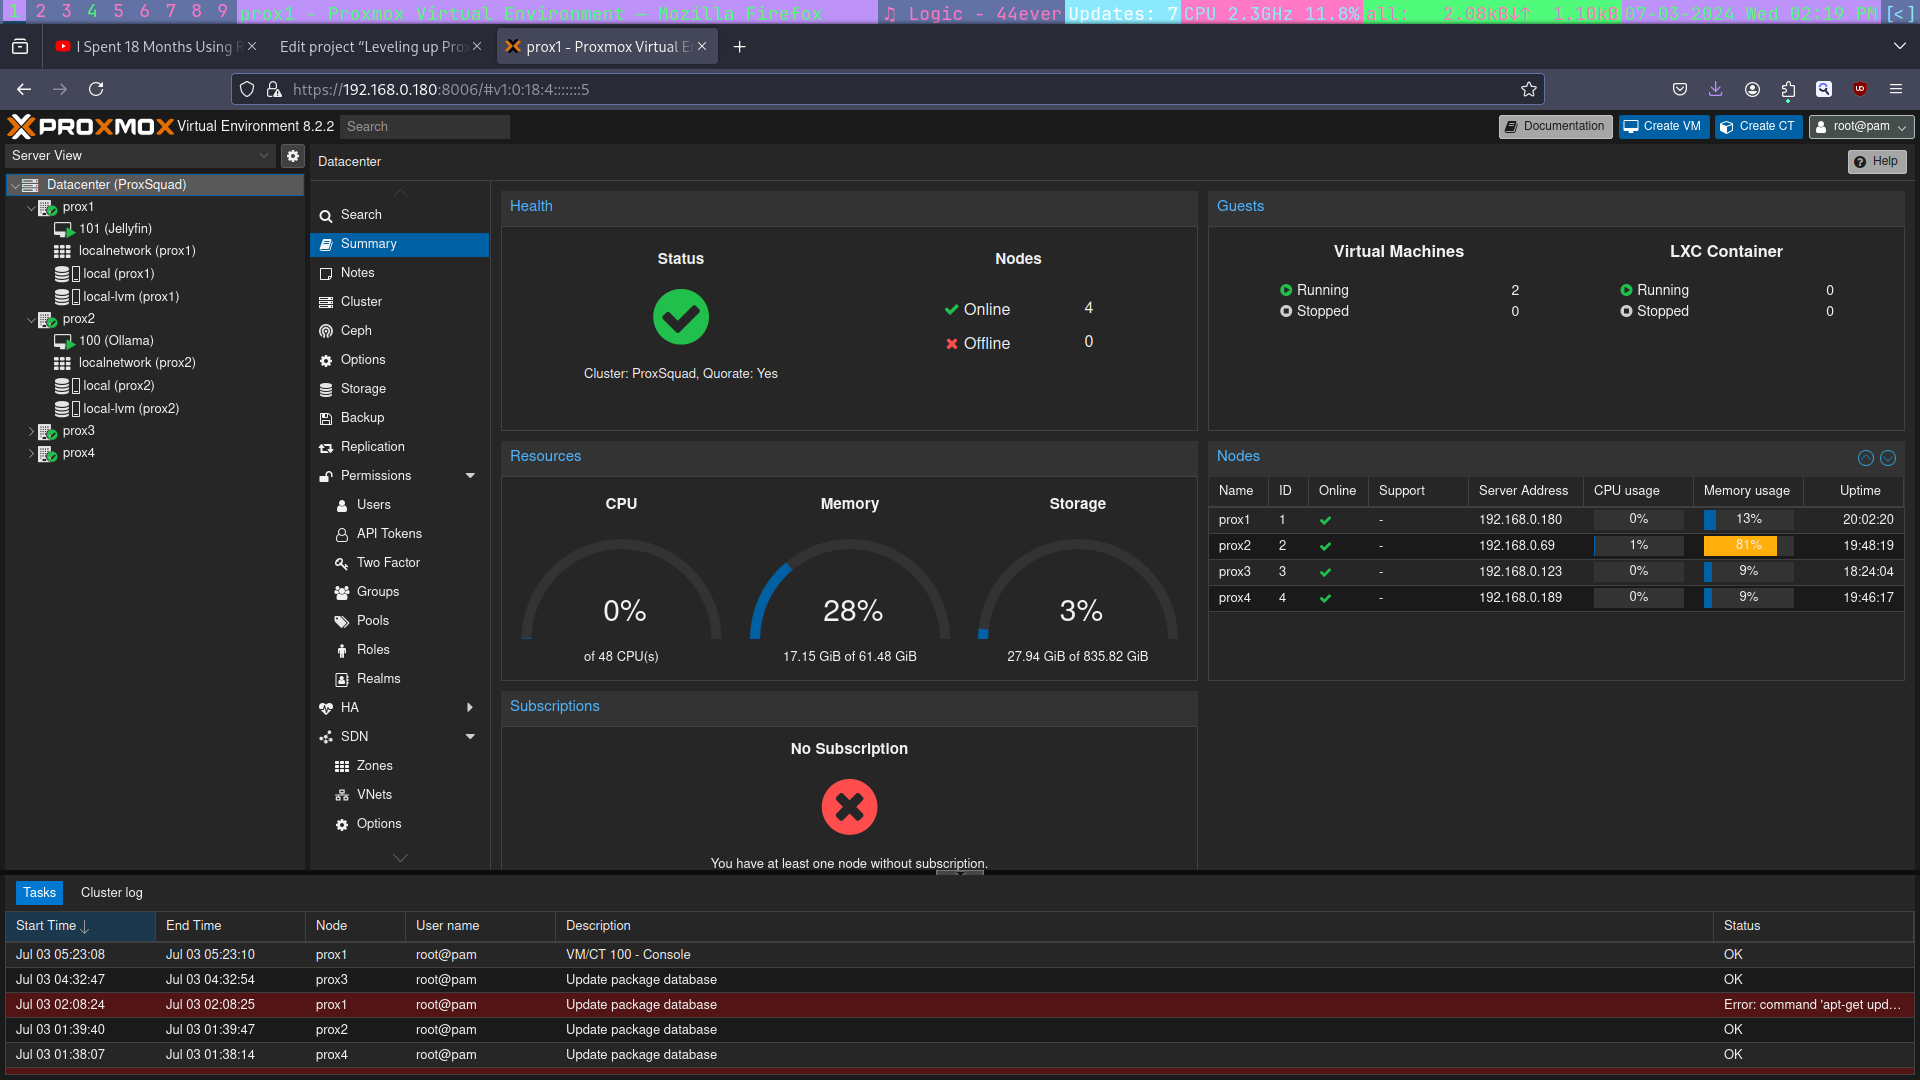
If you read my previous Proxmox article, you'll know that I'm running it off of a dated Dell Optiplex, and it really limits what I'm able to do server-wise in my network. Well, what if I had 4 of those? That would increase my power level tenfold and I'll be able to bring more server-related content to the wonderful people reading this! So that's what we're gonna do today, I've got 4 Dell Optiplex 7080s and we're going to, you guessed it, cluster them in Proxmox! For anybody unfamiliar, Proxmox is a type 1 hypervisor, which means that it is a VM installed on baremetal, as opposed to being run through your host OS like VirtualBox. If I recall, I previously had trouble trying to install Proxmox via Ventoy, so I should have a flash drive that I dd'd with it around here somewhere... Ah screw it, I'm sure that the flash drive is an older version anyway, so lets grab the most recent ISO, located at https://www.proxmox.com/en/downloads/proxmox-virtual-environment/iso, we're going to Reject All Cookies, then grab the Proxmox VE 8.2 ISO Installer. There's a download and a torrent option, because it's only 1.39gb and I'm on my laptop, I'm just gonna grab go the Download route but I'll probably go back and grab the torrent on another device just to share and support the project. Alright, now pull out the fresh flash drive. I manually mount all of my portable drives in the terminal anyway, so I know that my drive isn't mounted when I plug it in. If yours does auto-mount, just open a terminal, run 'sudo fdisk -l' to find the drive (its gonna be a /dev/sdX) format, then sudo umount on the drive. Then we'll go ahead and throw in the following command into our terminal: sudo dd bs=1M conv=fdatasync if=proxmox-ve_8.2-1.iso .iso of=/dev/sdX (once again, replace the X with your drive, sda, sdb, etc) We're gonna let this thing cook, then come back and start getting things installed! Lets insert the drive, make sure that we have a monitor, keyboard, and power source, then boot up and spam F12 like our lives depended on it. Boot from the USB (you may need to disable Secure Boot or some other BS in your BIOS at this point) and get going. The Proxmox installation process is pretty straightforward, I'm going to name each of these prox1,2,3,4.local and label the device accordingly as they're the same, uniform-looking 7080s and I don't want to get them mixed up in the physical mapping of my homelab. I'm going to set them up and go order more ethernet cords and another switch so that I can actually finish the rest of this project. Unfortunately I don't get paid until later this week so this may take a minute. ...AND we're back. I had to wait for cables, plus my new switch! (see https://stevenstone.tech/?project=back-to-the-homelab-again-cisco-3650-cx for more details) and we're up and running. Clustering device in Proxmox is actually super easy, especially if you're using the Web UI. Make sure that all of your devices are connected on the same subnet, and preferably have them named something of an organizational nature (mine are prox1, 2, 3, and 4.) Decide what the main device of the cluster will be, then go to Datacenter and just click Create Cluster. If your main device has a multi-port NIC, then this would be the part where you add network redundancy, but I'm rocking factory NICs on this since my 2 port is being saved for my firewall. Click on create and you'll have access to a nifty little copypasta code to paste into your other Proxmox devices to initiate the clusters. There were a few times where I thought that it wasn't working, but I just refreshed the page and it worked, everything is connected, resources are shared. Life is good. Honestly, the hardest part about this project was hardware costs. The people at Proxmox have done a really good job at making this user friendly enough to faceroll your keyboard and still get results. Thats it! I have my proxsquad cluster with prox1-prox4 set up!. Since they're connected to a fresh switch, the numbers correspond to their respective port numbers, which is always optimal. Compared to my old setup, which was a single Optiplex (model here), this thing can run a LOT more services on it with a combined 48 cores and 64gb of RAM. Now THIS is podracing...err a server!! I'm going to go ahead and grab a fresh Debian ISO to put on here, unfortunately you can not add an ISO to the full cluster (and far as I saw) so you'll have to add the ISOs the each instance separately. BUT you can use multiple device resources inside of 1 VM, which means that I can run Ollama with 24 cores and 32gb of RAM to make up for the lack of a GPU. I'm so excited to have this running, my previous "server" was very limited in it's capabilites for expansion, but this baby...this will keep me productive and happy for a long time! Check back in soon for more articles on the various service that I'm going to set up on this thing. Peace!